This tutorial explains how to perform an Add Edit, or split a clip, in Premiere Pro similar to how you would in Avid Media Composer. There’s a number of ways to do this and it varies from how one would do it in Media Composer. This quick tutorial explains it all.
Recapping Add Edit in Premiere Pro Tutorial
What is an Add Edit?
If you’re switching over from Avid Media Composer over to Premiere Pro you’re probably wondering how the heck you do an Add Edit. I know this was one of the first things that really made my scratch my head when I started learning Premiere Pro.
In case you aren’t familiar with Avid’s terminology, an Add Edit is basically how to split a clip in the timeline into two (or more) pieces. There are dozens of editing scenarios where this can be useful.
Keyboard Shortcut for Making an Add Edit in Premiere Pro
To perform an Add Edit, or split a clip, in Premiere Pro first check to see which tracks are selected in the timeline. Whichever tracks are active will have the Add Edit applied to it in just a second. Move the time position indicator to where you want to split the clip. When ready use the keyboard shortcut Command+K if you’re on a Mac or Control+K if you’re on a PC. If the video is linked to audio in the timeline then both parts of the clip will have the Add Edit applied.
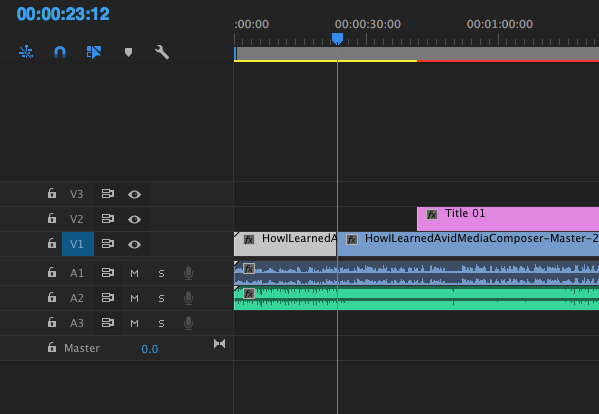
To apply the Add Edit or split all tracks no matter which tracks are selected, use the keyboard shortcut Command+Shift+K if you’re on a Mac or Control+Shift+K if you’re on a PC. This applies the Add Edit to all tracks at the time position indicator.
A note for you Avid Media Composer users: You cannot create Add Edits on black in the timeline. I know, I know. I’m not a fan of that either.
Using Premiere Pro’s Razor Tool to Make an Add Edit
An alternative to those keyboard shortcuts is to use the Razor Tool. First, find the Razor Tool in the Tools Panel. The keyboard shortcut to activate the Razor Tool is “C”.
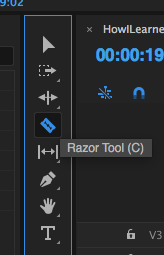
Then with the Razor Tool active click on any clip and at point on the timeline. It’ll create an Add Edit wherever you click on whatever clip you click on. You don’t have to worry about which tracks are selected. However I find it a bit more cumbersome to use and not as frame accurate.
Note: Some links in this article are affiliate links. All that means is that if you were to purchase something from the site after clicking the link, like Amazon, I would get a small commission. It’s no extra cost to you and maybe one day from it I’ll be able to buy a 6-pack of Sierra Nevada Pale Ale or Peyton some pumpkin Fruitables.
The music used in this video was “Throwback Thursday” by Mikey Geiger. It was purchased and licensed through my friends at Soundstripe (affiliate link). For 10% off a subscription use the code EVF at checkout.
Additional Suggested Viewing: How to Edit a Vlog in Premiere Pro
Did you enjoy this video? If so, I’d love to keep in touch. All you have to do is go here to stay in the loop on new blog posts, tutorials, and announcements.
– Josh