
This is the second lesson in a series on mastering Avid Media Composer’s keyboard shortcuts and the topic is Marking and Playing. In each lesson we tackle a handful of shortcuts that should be learned and practiced until the next lesson in a few days. This isn’t just any list of shortcuts. For many of them I’ll explain how they work and how I use them everyday as an editor.
Lesson 1 was on Media Composer’s Tools. This lesson is on the keyboard shortcuts in Avid for Marking and Playing. These are some of the most primary shortcuts I think you should learn. Some other shortcuts (Z, X, V, B, etc.) you can do damage to your timeline by accidentally doing something you weren’t expecting. With these shortcuts the worst thing you can do is clear an In or Out Point. Let’s get started!
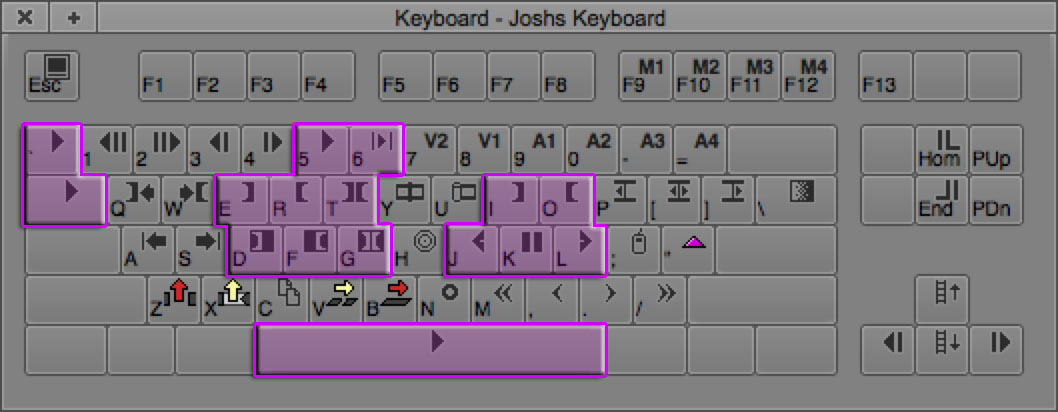
Marking Keyboard Shortcuts in Avid
Mark In Point

Shortcut: E or I
Marking an In Point is one of the must learn keyboard shortcuts. Media Composer works on three-point editing. Basically you need two In Points and an Out Point or vice versa. Put an In and Out Point on the clip in the Source Monitor then an In Point on the Timeline then hit Splice-In or Overwrite Edit and the clip from the Source Monitor gets edited onto the Timeline. Kind of make sense? There’s a bit of a hierarchy when it comes to In and Out Points and three-point editing but that’s for another lesson.
Even though I stand up here on my soapbox preaching about how important keyboard shortcuts are you will still use the mouse. It’s inevitable. So if you’re right-handed you will generally have your left hand on the keyboard. If so you’ll find you use “E” way more than “I” to mark an In Point. I however am I lefty so my right hand is always on the keyboard. That means I use the “I” key to mark an In Point more often. The same goes with our next shortcut.
Mark Out Point

Shortcut: R or O
This shortcut should be used alongside E and I. Side note: An easy way to remember “Mark In” and “Mark Out” is to think “I” for “In” and “O” for “Out.”
Mark Clip

Shortcut: T
If the Source Monitor is active and you just have one clip in it (this is probably 99% of the time in most workflows) hitting T will mark an In Point on the first frame and Out Point on the last frame. Going back to our three-point editing from earlier, if you hit Splice-In or Overwrite Edit this will edit the entire clip into the timeline at the time position indicator (the blue bar in the timeline) granted you don’t have an In or Out Point already on your timeline.
If the Record Monitor is active, hitting T will put an In and Point around the common first and last frames of whatever tracks that are active. In laymen’s terms, if you just have V1 selected and you hit T, wherever the time position indicator is that clip’s first and last frames will be marked. This is very useful if you want to quickly Lift or Extract a clip. If you have multiple tracks selected, Media Composer will find the first and last frame that match up on those tracks. If they don’t have one then it’ll mark and In and Out on the first and last frames of the entire timeline. It’s kinda confusing, sorry. Try it out yourself in Media Composer and it’ll make sense in 30 seconds.
Clear In Mark

Shortcut: D
When you hit D your In Point disappears.
Clear Out Mark

Shortcut: F
Hitting F will get rid of your Out Point. Pretty straightforward.
Clear Both Marks

Shortcut: G
This clears both In and Out Marks.
Quick tip: If you are in a Bin and have a clip(s) selected, you can hit D, F or G to clear it’s In and Out Points. This is very useful if you want to clear them all on a bunch of clips for whatever reason. Just select them all in the bin, hit G and all the In and Out Points are gone.
Playing Keyboard Shortcuts in Avid
Play/Pause

Shortcut: Space Bar, Tab, Tilde/Accent, 5 (Top Row)
Use any of the shortcuts above to play and pause in the Source or Record Monitor. For me, I use Space Bar since it’s so darn easy. I also have changed my Tab and Tilde/Accent keys to perform different functions – Add Edit and Match Frame respectively.
Play In to Out

Shortcut: 6 (Top Row)
Hit 6 on the top row, not the number pad, to play from an In Point to an Out Point. Hold down Opt (Mac) or Alt (PC) to loop this. I use this often when my laptop is lagging for one reason or another. It helps playback because there is less data trying to be stored in my computer’s RAM.
Play Forward
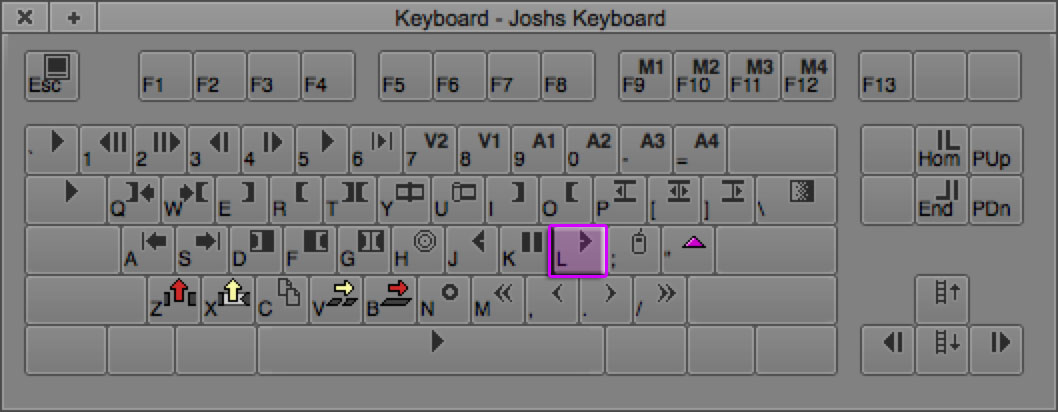
Shortcut: L
Hitting L will play just like hitting Space Bar, Tab, Tilde/Accent or 5 (top row) will. However, if you hit L again it’ll double the playback speed. If you hit it again it will speed it up again. If you are at 30FPS (Frames Per Second) the speeds will be: 30FPS (normal), 60FPS (double), 90FPS (triple), 150FPS and 240FPS.
Play Reverse

Shortcut: J
Play Reverse functions the exact same way as Play Forward but in the opposite direction, backwards.
Pause

Shortcut: K
Using J-K-L is a very powerful and easy way to speed up your editing. Hit J or L as many times as you want and you can always hit K to pause playback whenever you want. Hitting K does the same thing during playback as would happen if you hit Space Bar, Tab, Tilde/Accent or 5 (top row) but if you are using J or L your fingers are all right there and it’s a little easier to use the keyboard in that way IMO.
Next Up in the Mastering Avid’s Keyboard Shortcut Series
So that’s it for Mastering Avid Media Composer’s Keyboard Shortcuts Lesson 2 on Marking and Playing! Here’s the link to Lesson 3 on Moving. Make sure you’ve signed up to get emailed new posts here.
Homework! Before moving onto the next lesson spend at least an hour in Media Composer working on a project and using the shortcuts you learned today. Mark In Points and Out Points and try out Play Forward and Play In to Out. Practice, practice, practice!
Give me a shout if you have any questions on any of this in the comments below or through my Contact Page.
– Josh
4 thoughts on “Mastering Avid Media Composer’s Keyboard Shortcuts – Lesson 2: Marking and Playing”