This is the fifth lesson in a series on mastering Avid Media Composer’s keyboard shortcuts on modes, trimming, and slipping. Each lesson tackles a handful of shortcuts. By the end of all the lessons you should be flying through your editing sessions.
This isn’t just any old list of shortcuts. For many of them I explain exactly how they work and how I use them everyday as a professional editor.
If you’re just getting started, no worries. You can take this lesson and circle back to the previous lessons. You can find all the lessons here.
This lesson focuses on modes, trimming and slipping.
Lesson 5 Shortcuts — Modes, Trimming and Slipping
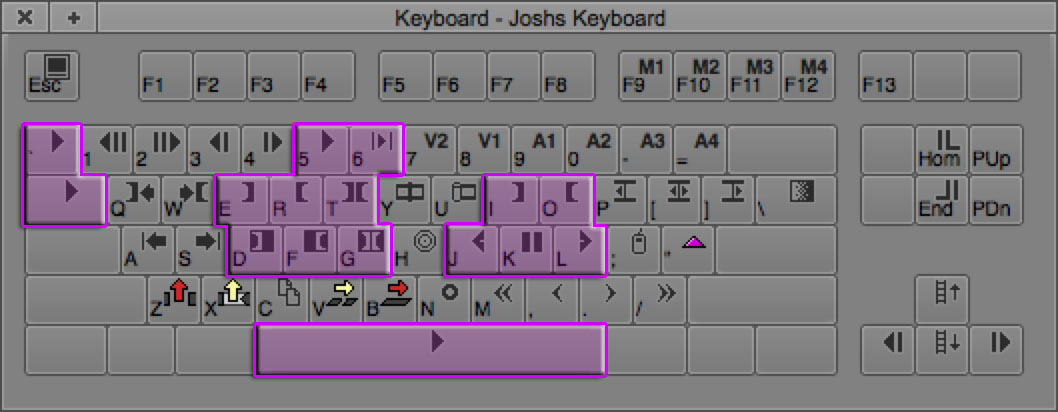
Modes and Trimming Keyboard Shortcuts in Avid
Source/Record Mode
Source/Record Mode
Shortcut: Y
Source/Record Mode is the mode you’re going to be in for the most part. This shortcut doesn’t do much unless you are not in Source/Record Mode. This shortcut will leave whatever mode you’re in and put you into Source/Record Mode.
Trim Mode
Trim Mode
Shortcut: U
The first of the Trimming keyboard shortcuts in Avid is Trim Mode. Hitting U will enter you into Trim Mode putting rollers around the nearest edit point to the Time Position Indicator on the selected tracks (did you follow that?). By default you’ll have the double pink rollers. This means when you add to one side you subtract from the other.
This is the fourth lesson in a series on mastering Avid Media Composer’s keyboard shortcuts and it’s on all the editing keyboard shortcuts. Each lesson tackles a handful of shortcuts. By the end of the lessons you should be flying through your editing sessions.
This isn’t just any old list of shortcuts. For many of them I explain how they work and how I use them everyday as a professional editor.
If you’re just getting started, no worries. You can take this lesson and circle back to the previous lessons. You can find all the lessons here.
This lesson focuses on editing. By editing I mean putting clips in and removing clips from the timeline. There’s only a few shortcuts in this lesson but they’re some of the most valuable and useful functions in Media Composer.
PS – There’s a pop quiz that I need you to give me an answer to at the end of the lesson.
Lesson 4 Shortcuts — Editing
List of Editing Keyboard Shortcuts in Avid
Here is a quick rundown on locked and unlocked tracks. It is important to understand how this works to fully grasp the keyboard shortcuts in this lesson. If you are familiar with these already then skip ahead. If not, I recommend reading this section.
Locked vs. Unlocked Tracks in Avid
Watch the video and/or read below 😀
You have the choice to lock or unlock a timeline track. I strongly recommend locking your tracks. In fact, I pretty much only edit with my tracks locked. 99% of the time my tracks are locked. There are only a handful of times when it’s more useful for them to be unlocked.
There’s a rectangle on each track in between the track name and the monitor box (see image). When it’s highlighted and there’s a black slanted rectangle thing in it then the track is locked. If it isn’t highlighted and there isn’t a black slanted rectangle thing then it is unlocked. Tracks are unlocked. by default
Locked vs. Unlocked Tracks
When you “lock a track” in After Effects it means you cannot make any changes to it. That’s not what this is in Media Composer. Locking tracks syncs the given timecode for all locked tracks, locking them together so if you make changes (i.e. adding or removing time to a track by editing in or editing out a clip) to one then you make changes to them all.
Locked vs. Unlocked Tracks Scenario
Here’s a scenario. Clips are on V1 and V2. The tracks are locked. Both clips begin at 01:02:20:14 and end at 01:02:24:14 – they’re 4 seconds long. If you have V1 selected and you extract from 01:02:21:10 to 01:02:22:10 (1 second) then the clips on V1 and V2 shorten by a second. Both clips would end at 01:02:23:14. If the tracks were unlocked however the clip on V1 would shorten to 3 seconds and the clip on V2 would remain the same.
I find that more times than not I want everything on the timeline to react together. If I shorten a clip on V1 at 01:03:00:00 I don’t want to have to think about the rest of the clips further down the timeline that are synced up with clips and audio on other tracks getting knocked out of alignment.
Locking tracks keeps you from unintentionally knocking your timeline out of sync. It takes a minute (or a couple weeks) to wrap your head around it but IMO it’s the safest, quickest and best way to edit. Confused about anything? Leave a comment.
Okay, ready for the keyboard shortcuts in Avid Media Composer for editing?!
This is the second lesson in a series on mastering Avid Media Composer’s keyboard shortcuts and the topic is Marking and Playing. In each lesson we tackle a handful of shortcuts that should be learned and practiced until the next lesson in a few days. This isn’t just any list of shortcuts. For many of them I’ll explain how they work and how I use them everyday as an editor.
Lesson 1 was on Media Composer’s Tools. This lesson is on the keyboard shortcuts in Avid for Marking and Playing. These are some of the most primary shortcuts I think you should learn. Some other shortcuts (Z, X, V, B, etc.) you can do damage to your timeline by accidentally doing something you weren’t expecting. With these shortcuts the worst thing you can do is clear an In or Out Point. Let’s get started!
Lesson 2 Shortcuts – Marking and Playing
Marking Keyboard Shortcuts in Avid
Mark In Point
Mark In Point
Shortcut: E or I
Marking an In Point is one of the must learn keyboard shortcuts. Media Composer works on three-point editing. Basically you need two In Points and an Out Point or vice versa. Put an In and Out Point on the clip in the Source Monitor then an In Point on the Timeline then hit Splice-In or Overwrite Edit and the clip from the Source Monitor gets edited onto the Timeline. Kind of make sense? There’s a bit of a hierarchy when it comes to In and Out Points and three-point editing but that’s for another lesson.
Even though I stand up here on my soapbox preaching about how important keyboard shortcuts are you will still use the mouse. It’s inevitable. So if you’re right-handed you will generally have your left hand on the keyboard. If so you’ll find you use “E” way more than “I” to mark an In Point. I however am I lefty so my right hand is always on the keyboard. That means I use the “I” key to mark an In Point more often. The same goes with our next shortcut.
Hey! This is the first lesson in a series on mastering Avid Media Composer’s keyboard shortcuts and it’s on Tools. We’ll go through pretty much every keyboard shortcut in Media Composer in this series.
If you’ve taken either of my quizzes (Quiz 1 and Quiz 2) and/or you are interested in becoming a faster, more efficient editor than this series is for you. Each lesson we’ll tackle a handful of shortcuts. We’ll go through what the shortcut is and for some I’ll comment on the tool, function or whatever the keyboard shortcut does based on my experience using Avid Media Composer hour after hour over the past decade.
Okay, enough talking. Let’s get into our first lesson!
Avid Media Composer Keyboard Shortcuts for Tools Recap
There are a bunch of tools in Media Composer. There’s the Audio Mixer, Audio EQ, Composer, Effect Editor, Media Tool and more. Ten (10!) of them have simple shortcuts. In this lesson we’ll cover them.
Audio Tool
Audio Tool
Cmd+1 (Mac) | Ctrl+1 (PC)
The Audio Tool shows the audio levels (how loud or soft it is) in visual form. Once you hit play the Audio Tool goes up and down based on the audio that’s being played at that frame. There’s a small sideways Audio Tool at the top of the Timeline. However the normal Audio Tool makes it much easier to see. I tend to always have this tool open.
Calculator Tool
Calculator
Cmd+2 (Mac) | Ctrl+2 (PC)
Did you know Media Composer had a calculator? This isn’t your ordinary calculator either. This calculator counts timecode!